

How to install the latest Python 3 version on Linux using sources
Introduction
Python 3.11.0 was officially released on October 24 2022. However, most Linux distributions have not yet upgraded to the latest Python version i.e. Python 3.11.2 (released on February 8 2023). Please visit this page to see the most recent versions.

The jump from versions 3.10.X to 3.11.X brought with it significant changes and improvements to Python code. Among the improvements is that Python is now 10 – 60% faster than before. That’s a big and noticeable speed boost. So beyond the usual reasons for upgrades i.e. security etc, I really wanted this version on my Linux desktop as soon as the final release was made publicly available.
If you are like me and don’t like waiting for your favourite open-source program to be supported on your Linux distribution, here is how to install the latest Python 3 version on Linux using sources.
Before you begin, check the current version on your Linux system:
python --version
Currently the version of Python on my Linux system is three (3) releases behind. So it is time for me to upgrade to the most recent version.
CAUTION: Due to the many dependencies on the currently installed Python common package, I highly recommend that you do not remove the existing version. Instead, we will install the latest version in an alternate location e.g. /usr/local
Prerequisites
Please ensure that your Linux system has the following packages installed:
On Ubuntu or Debian:
sudo apt-get install build-essential
sudo apt-get install autoconf automake gdb libffi-dev zlib1g-dev libssl-dev libncurses5-dev libgdbm-dev libnss3-dev libreadline-dev libsqlite3-dev
On Fedora or Rocky Linux:
sudo dnf groupinstall “Development Tools”
sudo dnf install openssl-devel libffi-devel bzip2-devel sqlite-devel
* You will also need wget which is generally included by default on most Linux distributions
Visit the Python downloads page for sources to get the direct link to latest Python source package. In this tutorial I will be using the XZ compressed source tarball i.e. Python-3.11.2.tar.xz
Download the latest Python package to a temporary directory:
wget -c -P /tmp https://www.python.org/ftp/python/3.11.2/Python-3.11.2.tar.xz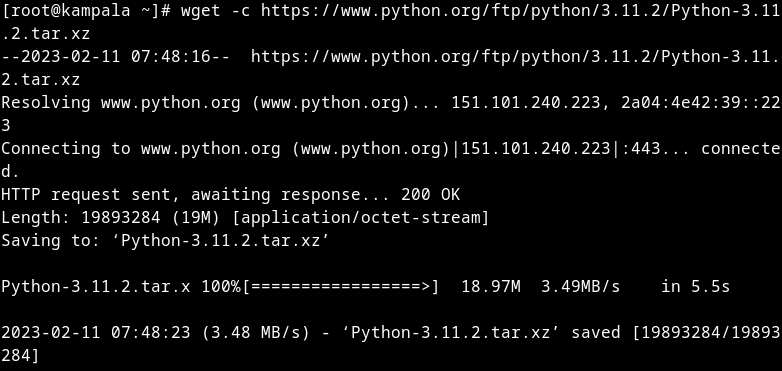
Unpack the Python 3 tarball:
tar xvf /tmp/Python-3.11.2.tar.xz -C /usr/src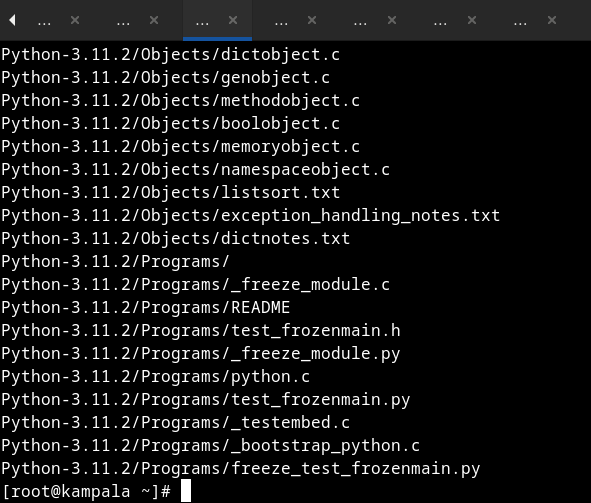
Compile and build Python:
cd  /usr/src/Python-3.11.2

./configure  --prefix=/usr/local  --enable-shared  --enable-optimizations  --with-system-expat  --with-system-ffi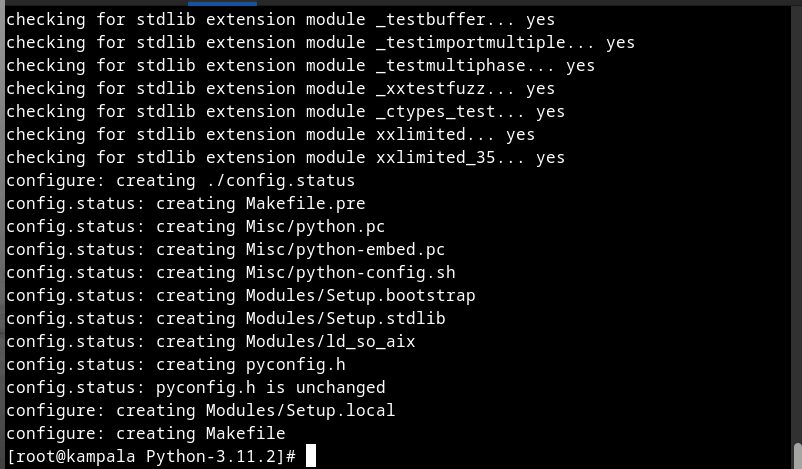
IMPORTANT: Ensure the prefix i.e. ‘/usr/local’ you use is different from that used by your Linux distribution otherwise you will overwrite the default Python 3 installation!
Optional: You can make some of your modules a permanent part of the Python interpreter. To do so, simply modify the file: Modules/Setup.local before running make. To see my my local setup, see the appendix.
sudo makeTIP: you can add “– j $(getconf _NPROCESSORS_ONLN)” to the make command in order to speed things up i.e. sudo make -j $(getconf _NPROCESSORS_ONLN)
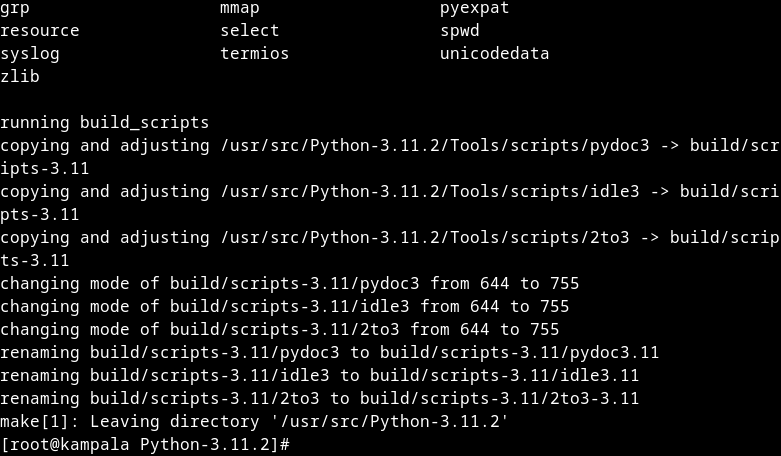
sudo make altinstall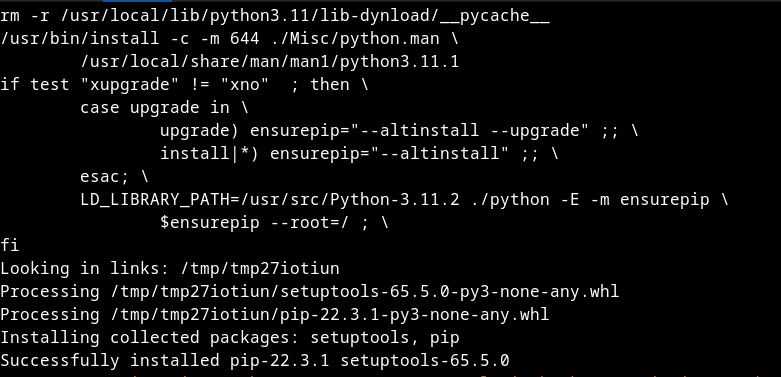
Add the following export command to your shell initialization file:
Using Bash shell:
echo “export LD_LIBRARY_PATH=$LD_LIBRARY_PATH:/usr/local/lib” >> ~/.bashrcThen source the file for now:
source ~/.bashrcTo verify if you now have the latest Python 3 (including pip installer) versions:
/usr/local/bin/python3.11 –version

/usr/local/bin/pip3.11 –version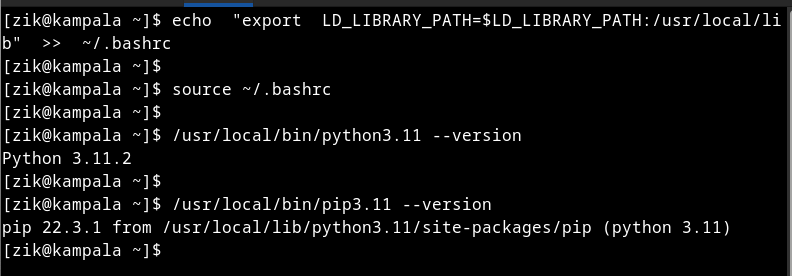
Congratulations! You now have the latest Python 3 version on your Linux system.
NOTE: When your distribution eventually catches up, you can remove this installation by issuing the ‘make uninstall‘ command in the installation directory i.e. /usr/src/Python3.11
Appendix
Here’s my sample ./Modules/Setup.local file:
array -DPy_BUILD_CORE_MODULE arraymodule.c
_contextvars _contextvarsmodule.c
_struct -DPy_BUILD_CORE_MODULE _struct.c
_random _randommodule.c -DPy_BUILD_CORE_MODULE
_elementtree -I$(srcdir)/Modules/expat -DHAVE_EXPAT_CONFIG_H -DUSE_PYEXPAT_CAPI _elementtree.c
_pickle -DPy_BUILD_CORE_MODULE _pickle.c
_datetime _datetimemodule.c
_zoneinfo _zoneinfo.c -DPy_BUILD_CORE_MODULE
_bisect _bisectmodule.c
_asyncio _asynciomodule.c
_json -I$(srcdir)/Include/internal -DPy_BUILD_CORE_BUILTIN _json.c
unicodedata unicodedata.c -DPy_BUILD_CORE_BUILTIN
fcntl fcntlmodule.c
spwd spwdmodule.c
grp grpmodule.c
select selectmodule.c
mmap mmapmodule.c
_csv _csv.c
_socket socketmodule.c
termios termios.c
resource resource.c
_posixsubprocess  -DPy_BUILD_CORE_BUILTIN _posixsubprocess.c
audioop audioop.c
_md5 md5module.c
_sha1 sha1module.c
_sha256 sha256module.c -DPy_BUILD_CORE_BUILTIN
_sha512 sha512module.c -DPy_BUILD_CORE_BUILTIN
_sha3 _sha3/sha3module.c
_blake2 _blake2/blake2module.c _blake2/blake2b_impl.c _blake2/blake2s_impl.c
syslog syslogmodule.c
binascii binascii.c
zlib zlibmodule.c -I$(prefix)/include -L$(exec_prefix)/lib -lz
pyexpat expat/xmlparse.c expat/xmlrole.c expat/xmltok.c pyexpat.c -I$(srcdir)/Modules/expat -DHAVE_EXPAT_CONFIG_H -DXML_POOR_ENTROPY -DUSE_PYEXPAT_CAPI
_multibytecodec cjkcodecs/multibytecodec.c
How to monitor the presence of nearby WiFi devices using Icinga2
Introduction
I recently published a Python based plugin for Icinga and Nagios monitoring platforms that monitors the presence of wireless devices in the vicinity.
I really like the stability and reliability Icinga provides when it comes to monitoring the state of hosts or services. There are so many software applications that let you do this, including one I talked about a while back called trackerjacker: https://github.com/calebmadrigal/trackerjacker
Why this way?
At first trackerjacker seemed like what I needed to do this sort of thing, but after several months of testing one issue persisted. The performance hit whenever I started the process was huge. The server, would frequently slow down, as packet capturing and monitoring of WiFi devices took place. So I decided to ditch this tool, and write my own plugin.
I am already using icinga on the server, so I figured, rather than write another app for polling, why not use the existing and well performing icinga2 monitoring software. After all, I had done this with bluetooth devices earlier and presence detection was working so well.
Pre-requisites
You are running a Linux based server with Icinga2 monitoring software installed, configured and working properly. There are several articles about how to install and configure icinga2 including the official documentation at:
https://icinga.com/docs/icinga-2/latest/doc/01-about/
The heavy lifting i.e. scanning is done by the Wireshark based CLI tool ‘tshark’. Therefore, ensure that Wireshark is installed on your system. Also, a separate wireless interface that supports monitor mode is required
To capture packets as a non-root user, run the following command in your terminal: sudo setcap cap_net_raw,cap_net_admin+eip $(which dumpcap)
If you’re still having trouble capturing packets as a non-root user, check out the following Wireshark wiki page:
https://wiki.wireshark.org/CaptureSetup/CapturePrivileges#Most_UNIXes
You will need to identify the MAC address of each wireless device you plan on monitoring. For phones for example, this information is in the Settings >> General >> About >> WiFi Address for iOS. For Android, go to Settings >> About >> Status >> Wi-Fi MAC address
NOTE: Some phones like the iPhone may have MAC randomization enabled, which makes it difficult to reliably monitor their presence status
Setup Icinga2 plugin
Download icinga2 monitoring plugin named ‘check_tshark’ from my Github page at:
https://github.com/zikusooka/icinga-nagios-plugins
Alternatively, you can clone the entire repository and check out my other plugins too:
git clone https://github.com/zikusooka/icinga-nagios-plugins
Copy the icinga2 plugin i.e. check_tshark to your icinga2 monitoring plugins directory e.g. /usr/lib64/nagios/plugins/
cp -v check_tshark /usr/lib64/nagios/plugins/
Configure Icinga2
Add new check and event command objects to icinga2 i.e. Add and save the following snippets to the file:
/etc/icinga2/conf.d/commands.conf
object CheckCommand "tshark" {
        import "plugin-check-command",

        command = [ PluginDir + "/check_tshark" ]

        arguments = {
                "-i"="$tshark_interface$"
                "-t"="$tshark_timeout$"
                "-a"="$tshark_address$"
        }
}
object EventCommand "wifi-tshark-status-event" {
import "plugin-event-command"
command = [ SysconfDir + "/icinga2/scripts/wifi-tshark-status-event.sh" ]
env = {
"HOSTALIAS" = "$host.display_name$",
"HOSTADDRESS" = "$address$",
"HOSTSTATE" = "$host.state$",
"HOSTSTATEID" = "$host.state_id$",
"HOSTSTATETYPE" = "$host.state_type$",
"HOSTOUTPUT" = "$host.output$",
"HOSTDISPLAYNAME" = "$host.display_name$",
"LASTHOSTSTATE" = "$host.last_state$",
"LASTEHOSTSTATEID" = "$host.last_state_id$",
"LASTHOSTSTATETYPE" = "$host.last_state_type$",
"LASTHOSTSTATECHANGE" = "$host.last_state_change$",
"LASTHOSTCHECK" = "$host.last_check$",
"LONGDATETIME" = "$icinga.long_date_time$",
}
}Add new host templates to icinga2 i.e. Add and save the following snippets to the file:
/etc/icinga2/conf.d/templates.conf
template Host "event-tshark-status" {
  max_check_attempts = 6
  check_interval = 30s
  retry_interval = 5s

  check_command = "tshark"

  enable_event_handler = 1
  event_command = "wifi-tshark-status-event"

  enable_flapping = 1
  flapping_ignore_states = ["Critical"]
}
Finally add the wireless devices you want to monitor to the hosts in icinga2 i.e. Add and save the following snippets to the file:
/etc/icinga2/conf.d/hosts.conf
NOTE: In addition to the MAC address, make sure you specify the WiFi interface used for monitoring
object Host "Phone_Zik" {
  import "event-tshark-status"
  vars.tshark_interface = "wlan1"
  vars.tshark_timeout = 10
  vars.tshark_address = "xx:xx:xx:xx:xx:xx"
}

object Host "Phone_Shushu" {
  import "event-tshark-status"
  vars.tshark_interface = "wlan1"
  vars.tshark_timeout = 10
  vars.tshark_address = "xx:xx:xx:xx:xx:xx"
}
Optional: Add Alert notification using MQTT
In order to send alerts whenever a WiFi device appears or disappears, you will need to set up a MQTT broker server. I personally use mosquitto on Fedora Linux. For detailed instructions on how to setup mosquitto on Fedora Linux, check out this how to: https://nullr0ute.com/2016/05/getting-started-with-mqtt-using-the-mosquitto-broker-on-fedora/
Since, we have already enabled event handling for our monitored devices in icinga2, all that is left is to add an event script that will be triggered by the HOST state of either UP or DOWN. Here’s an example:
Create the following script and make it executable:
cat > /etc/icinga2/scripts/wifi-tshark-status-event.sh <<ET
#!/bin/sh
# Variables
TSHARK_MAC_ADDRESS=$(echo "$HOSTOUTPUT" | grep -oP "(?<=\[).+?(?=\])")
MQTT_TOPIC_PRESENCE_TSHARK=Home/presence/$TSHARK_MAC_ADDRESS
MQTT_PUBLISH_CMD=/usr/bin/mosquitto_pub
MQTT_PUBLISH_OPTS="--quiet -h 127.0.0.1 -p 8883"
# Quit if type of state alert is 'SOFT'
[[ "$HOSTSTATETYPE" = "SOFT" ]] && exit 0

# Publish status via MQTT
if [[ "$HOSTSTATE" = "UP" ]];
then
$MQTT_PUBLISH_CMD $MQTT_PUBLISH_OPTS -t "$MQTT_TOPIC_PRESENCE_TSHARK" -m "Home"

else
$MQTT_PUBLISH_CMD $MQTT_PUBLISH_OPTS -t "$MQTT_TOPIC_PRESENCE_TSHARK" -m "Away"
fi
ET

chmod 755 /etc/icinga2/scripts/wifi-tshark-status-event.sh
To check your configuration and that all syntax is correct; run the following command:
icinga2 daemon -CIf all’s OK, restart icinga2 as follows:
systemctl restart icinga2Conclusion
Next, log into your icinga2 web interface (if you have this setup) and ensure your devices are reporting correctly.
In order to monitor alerting via MQTT run the following command in a terminal:
mosquitto_sub -v -h JambulaTV -p 8883 -t "JambulaTV/#" --insecure | grep presenceThat’s all for now. Until next time!

How to automatically backup your data to an external USB disk on Linux
Introduction
One of the most critical roles that any Systems Administrator must perform on a regular basis is that of running backups for an organization. These days, most big and medium sized offices use Network Attached Storage servers to quickly perform backups on their networks. However, for small offices with limited IT budgets, a DIY solution which uses a simple USB external hard drive is a viable option.
In this setup, the resident “IT guy” is assigned the task of backing up data. This could be from a handful of desktops/laptops, or a central backup server. However, the problem with this setup is that they often will forget to plug in the disk or even initiate the manual backup process, leading to a very unreliable backup scheme.
In this article, I will guide you on how to set up a cheaper, reliable and automated backup scheme. All the operator has to do is to plug in the USB external hard disk any time, and the backup process commences immediately.
This solution takes advantage of a bash script that is triggered once the USB hard disk is inserted into the computer desktop or laptop’s USB ports. The trigger mechanism is handled by udev rules via a systemd unit as will be shown below.
Prerequisites
Operating system: Linux
Desktop: GNOME – mainly for notification purposes
Username: erica (Must have permissions to run ‘sudo’)
Data: /home
Partition is NOT encrypted. See ‘cryptsetup’ tool
Create the following backup script. Save it and make it executable:
vim /opt/backup_2_usb_disk.sh
chmod 755 /opt/backup_2_usb_disk.sh
#!/bin/sh
# Variables
NORMALUSER=erica
VOLUMENAME=BACKUP
USB_DISK_PARTITION=$USB_DISK_PARTITION1
MOUNTPOINT=/run/media/$NORMALUSER/$VOLUMENAME
RSYNC_OPTIONS="-aAXvH”
# Excludes 4 /home
EXCLUDE_FILE_4_HOME_DIR=/tmp/exclude_dirs_in_home_dir
EXCLUDE_DIRECTORIES_IN_HOME_DIR="Videos"
NOTIFY_CMD=/usr/bin/notify-send
NOTIFY_ICON=/usr/share/icons/gnome/scalable/devices/media-zip-symbolic.svg
NOTIFY_TITLE=""


# Functions
notice () {
su -l $NORMALUSER -c "$NOTIFY_CMD -i $NOTIFY_ICON $NOTIFY_TITLE '$@'"
}

disable_automount () {
su -l $NORMALUSER -c "dbus-launch gsettings set org.gnome.desktop.media-handling automount false"
su -l $NORMALUSER -c "dbus-launch gsettings set org.gnome.desktop.media-handling autorun-never true"
}

sync_data () {
sudo rsync $RSYNC_OPTIONS --delete "$1" "$2"
}

mount_partition () {
# Create mountpoint if it does not exist
[ -d $MOUNTPOINT ] || mkdir -p $MOUNTPOINT
# Mount drive
mount $USB_DISK_PARTITION $MOUNTPOINT
STATUS_MOUNT=$?
if [ "$STATUS_MOUNT" != "0" ];
then
notice "ERROR: mount $USB_DISK_PARTITION $MOUNTPOINT failed"
exit 1
fi
}

backup_thinkpad () {
# Create backupdir directory
[ -d $MOUNTPOINT ] || mkdir $MOUNTPOINT

# Start of backup
notice "Backup Started"

# /home
echo $EXCLUDE_DIRECTORIES_IN_HOME_DIR | tr " " "\n" > $EXCLUDE_FILE_4_HOME_DIR
sleep 3
rsync $RSYNC_OPTIONS --delete --exclude-from=$EXCLUDE_FILE_4_HOME_DIR /home/ $MOUNTPOINT/home/
rm -f $EXCLUDE_FILE_4_HOME_DIR

# other partitions
}

umount_partition () {
umount $USB_DISK_PARTITION
STATUS_UMOUNT=$?
if [ "$STATUS_UMOUNT" != "0" ];
then
notice "ERROR: umount $USB_DISK_PARTITION failed"
exit 1
fi
}

enable_automount () {
su -l $NORMALUSER -c "dbus-launch gsettings set org.gnome.desktop.media-handling automount true"
su -l $NORMALUSER -c "dbus-launch gsettings set org.gnome.desktop.media-handling autorun-never false"
}


# Process the following routines
disable_automount
mount_partition
backup_thinkpad
umount_partition
enable_automount

# Notice of completion
sleep 10
notice "Backup completed successfully"
Start/Stop service
Create the systemd unit file:
/etc/systemd/system/backup-usb-disk.service and add the following:
[Unit]
Description=USB Portable Drive

[Service]
User=root
Type=oneshot
Environment=DISPLAY=:0
ExecStart=/opt/backup_2_usb_disk.sh

[Install]
WantedBy=multi-user.target
NOTES:
Reload systemd daemon i.e. ‘systemctl –system daemon-reload’
It is not necessary to enable or start the above unit at this time
since that will be done by the udev rule below.
UDEV rules
Create the udev rules file: /etc/udev/rules.d/97-backup-usb-disk.rules and add the following:
ACTION=="add", ATTRS{idVendor}=="0bc2", ATTRS{idProduct}=="2400", SYMLINK+="disk/by-id/$env{ID_NAME}_$env{ID_SERIAL}", RUN+="/usr/bin/systemctl start backup-usb-disk.service"

ACTION=="remove", ATTRS{idVendor}=="0bc2", ATTRS{idProduct}=="2400", RUN+="/usr/bin/systemctl stop backup-usb-disk.service"
NOTES:
To find your USB disk Vendor and Product ID, run the command:
udevadm info -a -p $(udevadm info -q path -n /dev/sdX) | grep -B2 -i -e idvendor -e idproduct
Change ‘X’ to suit your setup
Run the command ‘udevadm control –reload’ to reload the rules
Conclusion
That’s it! Now when ever, the USB external disk is plugged into the USB port, the backup script will be triggered. You can extend the above mentioned backup script to not only back up other partitions beyond just the /home in our example, but also email the operator whenever the process completes.
How to receive Linux server alerts on your phone via WhatsApp
In my last article, I wrote about how to receive Linux server alerts on your phone via telegram. While telegram has a rich feature set, it is still not as popular as whatsapp at least in most regions. Almost, everyone I know is using whatsapp. With the recent addition of end-to-end ecryption, I’ve since relaxed my negative opinions of this service. Therefore, I decided to write a follow-up to my previous article, and show you how to get alerts from your Linux server via whatsapp. I will not delve into the setup of icinga2, however, once you are able to send messages to whatsapp, things should be pretty much self explanatory.
Thanks to Tarek Galal, who wrote a python library called yowsup to interface with whatsapp API.
First install it as follows:
pip install yowsup2
If installation fails, ensure that your have installed all the required dependencies on your Linux box which include python2.6+, python-dateutil, argparse,readline, pillow. If you intend to use encryption, you will need to install protobuf, pycrypto, python-axolotl-curve25519
Yowsup comes with a command-line tool appropriately named; yowsup-cli. For a full understanding of its usage, please visit the yowsup-cli wiki
Registration
As expected, you will need to register your phone. This can be done simply as follows:
yowsup-cli registration -d -E android -m 641 -n 10 -p 256XXXXXXXXX -C 256 -r sms
The arguments explained:
-d For debugging
-E This is the environment. Specifically set this to android. The default will cause you to run into ‘no_route’ errors.
-m This is the MCC for your country. In my case 641 is for Uganda. Use the site: http://mcclist.com/mobile-network-codes-country-codes.asp to locate yours
-n This is the MNC for your Telecom provider. Again, use the site: http://mcclist.com/mobile-network-codes-country-codes.asp to locate yours
-p This is your phone number. Include the country code specified in next option -C
-C This is the country telephone code. In my case 256 is for Uganda.
-r (sms|voice) This is method by which pin code will be sent to you
If execution of the above command is successful, you will receive, either a text message or voice call with the PIN code. Use this code to complete the registration process as follows:
yowsup-cli registration -d -E android -p 2567XXXXX -C 256 -R PIN-CODE
The arguments are similar to above, except for:
– R which allows you to register using the provided PIN-CODE
Once the command above has been executed successfully, the results displayed will look like the following
kind: free
pw: dfggHHSGGdIcdddRN567gjy=
price: US$0.99
price_expiration: 147567899
currency: USD
cost: 0.99
expiration: 4444444444.0
login: 256XXXXXXXXXX
type: new
Take note of the 2 fields: pw and login
Sending Messages
You should now be able to send messages using the command line. Test sending as follows:
yowsup-cli demos -d -l "256XXXXXXXX:dfggHHSGGdIcdddRN567gjy=" -s 256XXXXXXXXX "This is a test – Hello World"
The arguments explained:
-d For debugging
-l login. Enter in format [login:password]
-s The recipient’s phone number
At this point your recipient should be able to receive your message.
For monitoring with icinga2, you will need to create a script using the above command for sending messages. Make it executable and place it in location of your scripts. From, here, setup of icinga2 is like any other as shown in my previous article.
If you need more assistance or are interested in Linux and Open Source stuff, follow me @jzikusooka.
How to receive Linux server alerts on your phone via telegram
To monitor my Linux servers, I have been using icinga since its forking from the popular Nagios. Icinga has really matured over the last few years and currently at version 2.4.4, I would recommend anyone serious at network and server monitoring to check this open source project. Installation and setup of icinga2 is somewhat complex, but if you are an experienced command line sort of guy, its not that hard at all. In fact the introduction of icingaweb2 has made it possible to have an easy to use interface to setup your monitoring needs. I will not delve into the nitty gritty of install and setup. For that please take a look at the detailed documentation.
Several alerts are possible when using Icinga including e-mail, sms, XMPP, IRC, twitter etc. I wanted a way to get notified of host and service failures using telegram. Luckily, telegram provides an API to do just that.
The secret source in all of this; is to install a command line interface for telegram called telegram-cli . In order for telegram-cli to compile without any issues, ensure that all dependencies are installed
For Fedora:
sudo dnf -y install
lua-devel openssl-devel libconfig-devel readline-devel libevent-devel
jansson-devel python-devel
For Ubuntu/Debian:
sudo apt-get install
libreadline-dev libconfig-dev libssl-dev lua5.2 liblua5.2-dev
libevent-dev libjansson-dev libpython-dev make
Now install telegram-cli
cd /usr/src && git clone –recursive https://github.com/vysheng/tg.gitNote: Make sure you add the recursive flag to git clone, otherwise make will fail
cd tg./configure && makeThe binary is under ./bin/telegram-cli. Simply create a symbolic link to it.
cd /usr/sbin && ln -s /usr/src/tg/bin/telegram-cli .Thats it for the installation of telegram-cli. Please read the README file in the sources root folder, especially on how to use this application.
Icinga2 telegram-cli setup
First ensure that the user icinga (created during icinga install process) can send a message using telegram-cli. Remember all alerts go out under the icinga user, so you have to get this part working first, lest you spend hours troubleshooting.
Temporarily change the shell for icinga from ‘/sbin/nologin’ to ‘/bin/bash.’ Remember to change back to nologin for icinga user when testing is completed.
usermod -s /bin/bash icingaNow change to user icinga: Assumming that you are root user, if not you will be prompted for a password, which you would setup as root.
su -l icingatelegram-cliEnter your phone number and SMS code sent when prompted
Then test to see if you can send a message:
telegram-cli -D -W -e "msg [PEER_NAME] 'Hello World'"If it works, then you can proceed to configure icinga2.
Create notification script for services
cat > /etc/icinga2/scripts/notify_services_via_telegram.sh << EOF
#!/usr/bin/env bash
TELEGRAM_CMD=/usr/sbin/telegram-cli
TELEGRAM_OPTS=”-D -W”
TELEGRAM_PEER=[PEER_NAME]
TELEGRAM_MSG=$(cat <<TEMPLATE
[$HOSTALIAS] $NOTIFICATIONTYPE: $SERVICEDESC is $SERVICESTATE
TEMPLATE
)
$TELEGRAM_CMD $TELEGRAM_OPTS -e “msg $TELEGRAM_PEER ‘$TELEGRAM_MSG'”
EOF
Ensure that above script is executable:
chmod 755 /etc/icinga2/scripts/notify_services_via_telegram.shProceed to configure commands, notifications, and hosts config files: Note: Am only setting up notifications for services. You can do the same for hosts information.
cat >> /etc/icinga2/conf.d/commands.conf <<EOF
/** Telegram */
object NotificationCommand “telegram-service-notification” {
import “plugin-notification-command”
command = [ SysconfDir + “/icinga2/scripts/notify_services_via_telegram.sh” ]
env = {
“NOTIFICATIONTYPE” = “$notification.type$”
“SERVICEDESC” = “$service.name$”
“HOSTALIAS” = “$host.display_name$”,
“HOSTADDRESS” = “$address$”,
“SERVICESTATE” = “$service.state$”,
“LONGDATETIME” = “$icinga.long_date_time$”,
“SERVICEOUTPUT” = “$service.output$”,
“NOTIFICATIONAUTHORNAME” = “$notification.author$”,
“NOTIFICATIONCOMMENT” = “$notification.comment$”,
“HOSTDISPLAYNAME” = “$host.display_name$”,
“SERVICEDISPLAYNAME” = “$service.display_name$”,
“USEREMAIL” = “$user.email$”
}
}
EOF
cat >> /etc/icinga2/conf.d/notifications.conf <<EOF
/** Telegram */
apply Notification “telegram-icingaadmin” to Service {
import “telegram-service-notification”
user_groups = host.vars.notification.telegram.groups
users = host.vars.notification.telegram.users
assign where host.vars.notification.telegram
}
EOF
To get alerts on services for a host, add the following stanza to the host configuration in /etc/icinga2/conf.d/hosts.conf
/* Telegram */
vars.notification[“telegram”] = {
groups = [ “icingaadmins” ]
}
Finally, check your config files
icinga2 daemon -CRestart icinga if all is OK. You will now be notified via telegram when services fail for the above configured host.
How to install a wireless hotspot with captive page on Linux using CoovaChilli
The purpose of this article is to demonstrate how you can turn a Linux based computer or laptop into a wireless hotspot where users can be authenticated via a captive portal page. For this task, the primary controller software will be CoovaChilli. This software is an ideal hotspot management solution for hotels, restaurants, supermarkets, parks, and any place offering WiFi Internet. Read more
How to configure nginx for use with WordPress and other CMS based websites
This is the second part of my Nginx tutorial. The first part covered the installation process. In this post, I will show you how to modify the default configuration and get your server ready to serve CMS based websites like WordPress, Drupal, Joomla, Gallery etc
Before delving into the configuration of nginx, it is important to ensure that all the prerequisite software is installed and properly configured. Like all of my tutorials, I am using Linux and specifically Fedora 20.
PHP
Install the following php and related modules:
yum install php php-fpm php-pecl-apcu php-pdo php-mcrypt php-common php-mysqlnd php-process php-gd php-pear php-pear-DB php-pgsql php-xml php-cli php-xmlrpc php-mbstring php-pecl-igbinary php-pecl-memcache php-pecl-memcached php-pecl-mongo php-pecl-jsonc
Edit the php configuration file:
vim /etc/php.ini
I recommend setting the following parameters in php.ini:
short_open_tag = On
date.timezone = Africa/Kampala (or your time zone)
Edit the php-fpm configuration file:
vim /etc/php-fpm.d/www.conf
Change the following options in www.conf:
[www]
listen = 127.0.0.1:9000
;listen.allowed_clients = 127.0.0.1
user = nginx
group = nginx
Change permissions of the php sessions directory:
chown nginx:nginx /var/lib/php
Now enable and start php-fpm service:
systemctl enable php-fpm.service && systemctl start php-fpm.service
OPENSSL
Install openssl if you plan on securing your server; which you should!
yum install openssl openssl-libs openssl-devel
Add ssl directory where certificate and key will be stored:
mkdir /etc/nginx/ssl
Generate self-signed SSL certificate and key for your webserver:
openssl req -new -x509 -out /etc/nginx/ssl/cert.pem -key /etc/nginx/ssl/cert.key -days 365
SPAWN-FCGI
Install spawn-fcgi, a simple program for spawning FastCGI processes:
yum install spawn-fcgi
Edit the environment file for spawn-fcgi:
vim /etc/sysconfig/spawn-fcgi
Make the following changes:
FCGI_SOCKET=/var/run/fcgiwrap.socket

FCGI_PROGRAM=/usr/sbin/fcgiwrap

FCGI_USER=nginx

FCGI_GROUP=nginx

FCGI_EXTRA_OPTIONS="-M 0700"

OPTIONS="-u $FCGI_USER -g $FCGI_GROUP -s $FCGI_SOCKET -S $FCGI_EXTRA_OPTIONS -F 1 -P /var/run/spawn-fcgi.pid -- $FCGI_PROGRAM"
Enable and start spawn-fcgi.service:
systemctl enable spawn-fcgi.service && systemctl start spawn-fcgi.service
FCGIWRAP
Install fcgiwrap, a simple FastCGI wrapper for CGI scripts:
cd /usr/src
Download fcgiwrap sources:
git clone https://github.com/gnosek/fcgiwrap.git

cd /usr/src/fcgiwrap

autoreconf -i

./configure --prefix=/usr

make && make install
CONFIGURATION
Nginx’s configuration files are located under /etc/nginx. And as specified by the installation configure command in the previous post, the main configuration file is: /etc/nginx/nginx.conf. This is where I will make most of my changes.
vim nginx.conf
Add the following to nginx.conf and save it:
user nginx;

worker_processes 1;

#

events {

worker_connections 1024;

}

#

http {

include mime.types;

include conf.d/*.conf;

include sites-enabled/*;

default_type application/octet-stream;

log_format main '$remote_addr - $remote_user [$time_local] "$request" '

'$status $body_bytes_sent "$http_referer" '

'"$http_user_agent" "$http_x_forwarded_for"';

sendfile on;

keepalive_timeout 65;

#

server {

listen 80;

server_name localhost;

root html;

index index.html index.htm index.php;

autoindex on;

access_log /var/log/nginx/localhost.access.log main;

#

location / {

}

#

error_page 500 502 503 504 /50x.html;

#

location = /50x.html {

}

#

location ~ \.php$ {

include includes/php_params;

}

#

location ~* \.(cgi|chi)$ {

include includes/cgi_params;

}

# Add xmlrpc scgi support

#

location ~ ^/RPC2$ {

scgi_pass localhost:5000;

include scgi_params;

}

}

#

# HTTPS server

#

server {

listen 443 ssl;

server_name localhost;

root html;

index index.html index.htm index.php;

#

ssl_certificate ssl/cert.pem;

ssl_certificate_key ssl/cert.key;

ssl_session_cache shared:SSL:1m;

ssl_session_timeout 5m;

ssl_ciphers HIGH:!aNULL:!MD5;

ssl_prefer_server_ciphers on;

#

location / {

}

#

location ~ \.php$ {

include includes/php_params;

}

#

location ~* \.(cgi|chi)$ {

include includes/cgi_params;

}

}

}
To get details on what these directives exactly mean and the syntax used above, visit the Nginx documentation
NOTES:
Nginx is pretty picky when it comes to Syntax, so:
– The location directive is placed within a server directive.
– Also, all directives must end with a semicolon.
Like other similar programs in UNIX, you can split the configuration file into several files using the parameter: include as shown in the above file. This makes maintenance and packaging of these files easier.
Create other configuration directories:
mkdir /etc/nginx/{conf.d,includes,sites-enabled}
Add the following files to the includes directory:
vim /etc/nginx/includes/php_params
gzip off;

fastcgi_pass unix:/var/run/fcgiwrap.socket;

fastcgi_index index.cgi;

#

fastcgi_param SCRIPT_FILENAME $document_root$fastcgi_script_name;

fastcgi_param QUERY_STRING $query_string;

fastcgi_param REQUEST_METHOD $request_method;

fastcgi_param CONTENT_TYPE $content_type;

fastcgi_param CONTENT_LENGTH $content_length;

#

fastcgi_param SCRIPT_NAME $fastcgi_script_name;

fastcgi_param REQUEST_URI $request_uri;

fastcgi_param DOCUMENT_URI $document_uri;

fastcgi_param DOCUMENT_ROOT $document_root;

fastcgi_param SERVER_PROTOCOL $server_protocol;

fastcgi_param HTTPS $https if_not_empty;

#

fastcgi_param GATEWAY_INTERFACE CGI/1.1;

fastcgi_param SERVER_SOFTWARE nginx/$nginx_version;

#

fastcgi_param REMOTE_ADDR $remote_addr;

fastcgi_param REMOTE_PORT $remote_port;

fastcgi_param SERVER_ADDR $server_addr;

fastcgi_param SERVER_PORT $server_port;

fastcgi_param SERVER_NAME $server_name;

#

# PHP only, required if PHP was built with --enable-force-cgi-redirect

fastcgi_param REDIRECT_STATUS 200;
vim /etc/nginx/includes/cgi_params
fastcgi_pass 127.0.0.1:9000;

fastcgi_index index.php;

#

fastcgi_param SCRIPT_FILENAME $document_root$fastcgi_script_name;

fastcgi_param QUERY_STRING $query_string;

fastcgi_param REQUEST_METHOD $request_method;

fastcgi_param CONTENT_TYPE $content_type;

fastcgi_param CONTENT_LENGTH $content_length;

#

fastcgi_param SCRIPT_NAME $fastcgi_script_name;

fastcgi_param REQUEST_URI $request_uri;

fastcgi_param DOCUMENT_URI $document_uri;

fastcgi_param DOCUMENT_ROOT $document_root;

fastcgi_param SERVER_PROTOCOL $server_protocol;

fastcgi_param HTTPS $https if_not_empty;

#

fastcgi_param GATEWAY_INTERFACE CGI/1.1;

fastcgi_param SERVER_SOFTWARE nginx/$nginx_version;

#

fastcgi_param REMOTE_ADDR $remote_addr;

fastcgi_param REMOTE_PORT $remote_port;

fastcgi_param SERVER_ADDR $server_addr;

fastcgi_param SERVER_PORT $server_port;

fastcgi_param SERVER_NAME $server_name;

#

# PHP only, required if PHP was built with --enable-force-cgi-redirect

fastcgi_param REDIRECT_STATUS 200;
VIRTUAL HOSTS
Now let’s configure a virtual host. In this tutorial, I use example.com as the domain name.
vim /etc/nginx/sites-enabled/example.com
 server {

listen 80;

#

server_name zikusooka.com www.zikusooka.com;

root html/vhost.example;

index index.html index.htm index.php;

#

location / {

}

#

location ~ \.php$ {

include includes/php_params;

}

#

location ~* \.(cgi|chi)$ {

include includes/cgi_params;

}

}
WEB CONTENT
Add an index file to the main server’s root directory, for example:
vim /usr/share/nginx/html/index.html
Add the following and save (This is just for testing, any HTML web page should work):
 <HTML>

<B>Hello World. Welcome to my Nginx web server!</B>

<HTML>
Create the document root directory for your virtual host:
mkdir /usr/share/nginx/html/example.com
Add your document root in the above created directory. For Example create a file named index.php.
vim /usr/share/nginx/html/example.com/index.php
Add the following and save (This is just to test php, so any simple php page should work):
<?

phpinfo();

?>
TESTING
Finally, restart nginx web server:
systemctl start nginx
If all goes well, you should now be able to browse html, php, and cgi pages on your server. You can then proceed to installing your WordPress or other content management system.