

Hass Core Installer 2025.10.3 Released
I have released Hass Core Installer 2025.10.3! There are no changes in this version besides upgrade to the latest Home Assistant.
Hass Core Installer is a free and open source tool that helps you install and manage Home Assistant Core using the manual installation method. Even though this method is now officially deprecated, I know some people still prefer it for its flexibility and control.
You can find the project and source code here: https://github.com/zikusooka/hass-core-installer

Announcing Jambula OS Linux Version 2025.6.0 – Now Available!
I’m excited to share that the latest image of Jambula OS Linux – Version 2025.6.0 is officially live!
This small, maintenance-focused update wraps up important improvements as I look ahead to a week full of fresh open source ideas, conversations, and community engagement.
Why Jambula OS?
Jambula OS is a lightweight, flexible Linux distribution optimized specifically for Raspberry Pi and other low-power, SoC-based edge devices. It’s designed with performance, stability, and adaptability in mind, making it the perfect foundation for embedded systems and automation projects at the edge.
My vision? To make Jambula OS the go-to platform for innovators building smart home and office automation hubs. Ambitious? Absolutely. But innovation thrives on ambition!
What’s next?
With this update complete, I will soon begin preparations for the next major release. Stay tuned for exciting new features and enhancements that will continue to empower developers and creators alike.
Download the latest Jambula OS image here:
https://github.com/zikusooka/Jambula-OS
Exciting times are ahead. Let’s keep building the future together!

Hass-Core-Installer: Keeping Home Assistant Core Alive
It is finally happening – Home Assistant Core, along with other legacy installation methods and 32-bit system support, is officially being deprecated. The Home Assistant team announced this major shift in their recent blog post, signaling the end of an era for many longtime users who have relied on Core and Supervised installs for years. Starting with the 2025.12 release, support for these installation methods and older architectures like i386, armhf, and armv7 will be phased out.
For most users, the path forward is clear: migrate to Home Assistant OS or Home Assistant Container. These methods offer a streamlined, more stable experience with ongoing official support. But what about those of us who love the flexibility and control that Home Assistant Core provides? Or those running on hardware that does not fit the new supported architectures?
Hass-Core-Installer to the rescue
If you are a developer or among the few who want to continue running Home Assistant Core despite the official deprecation, there’s no need to despair! I created Hass-Core-Installer, a free and open source tool designed to help you install and maintain Home Assistant Core on your own terms. The latest offline version supported is 2025.5.3.
Hass-Core-Installer is a practical, easy-to-customize script for users who want to keep using Core without relying on official support. Whether you are a developer, hobbyist, or power user, this tool helps you to keep your Home Assistant setup running smoothly, even as the official landscape changes.
Why Hass-Core-Installer?
- Flexibility: Retain full control over your Home Assistant environment.
- Compatibility: Continue using Core on your preferred hardware, including some 32-bit systems.
Ready to Keep Your Home Assistant Core Setup?
If you want to learn more and why I created it, visit my blog post here: Hass-Core-Installer or if you’re ready to try it, go to GitHub where you will find everything you need to install Home Assistant Core confidently and keep it running well beyond the official end-of-life.
While the Home Assistant project moves forward with new priorities, the spirit of customization and hands-on control lives on through projects like Hass-Core-Installer. If you are passionate about Home Assistant Core, this is your chance to stay ahead and keep your smart home running your way.
Easily Toggle Audio Between Multiple Streams with My Updated PipeWire based Tool
I have updated a tool that I find very useful, especially when watching or listening to multiple streams at the same time. For example, I often have Live TV, podcasts, or music playing on my Linux PC. Sometimes, I want to quickly switch which stream I hear without stopping the others.
With this tool, you too can now easily cycle through all your active media apps (like VLC, MPV, or FFPLAY) and mute or unmute them so that only one is audible at a time. The other streams keep playing in the background, but you won’t hear them until you toggle to them.
This is perfect for following several live TV channels during news hour or switching between music and podcasts without missing anything.
If you use GNOME, you can even set a keyboard shortcut to make switching super fast!
I’m still working on improving this tool, so if you have any suggestions or find any bugs, please let me know. You can check out the project and download it from my GitHub repository.
https://github.com/zikusooka/toggle-pw-volumes
Enjoy, and happy streaming!
Linux TIPS
- Loading Mastodon feed...
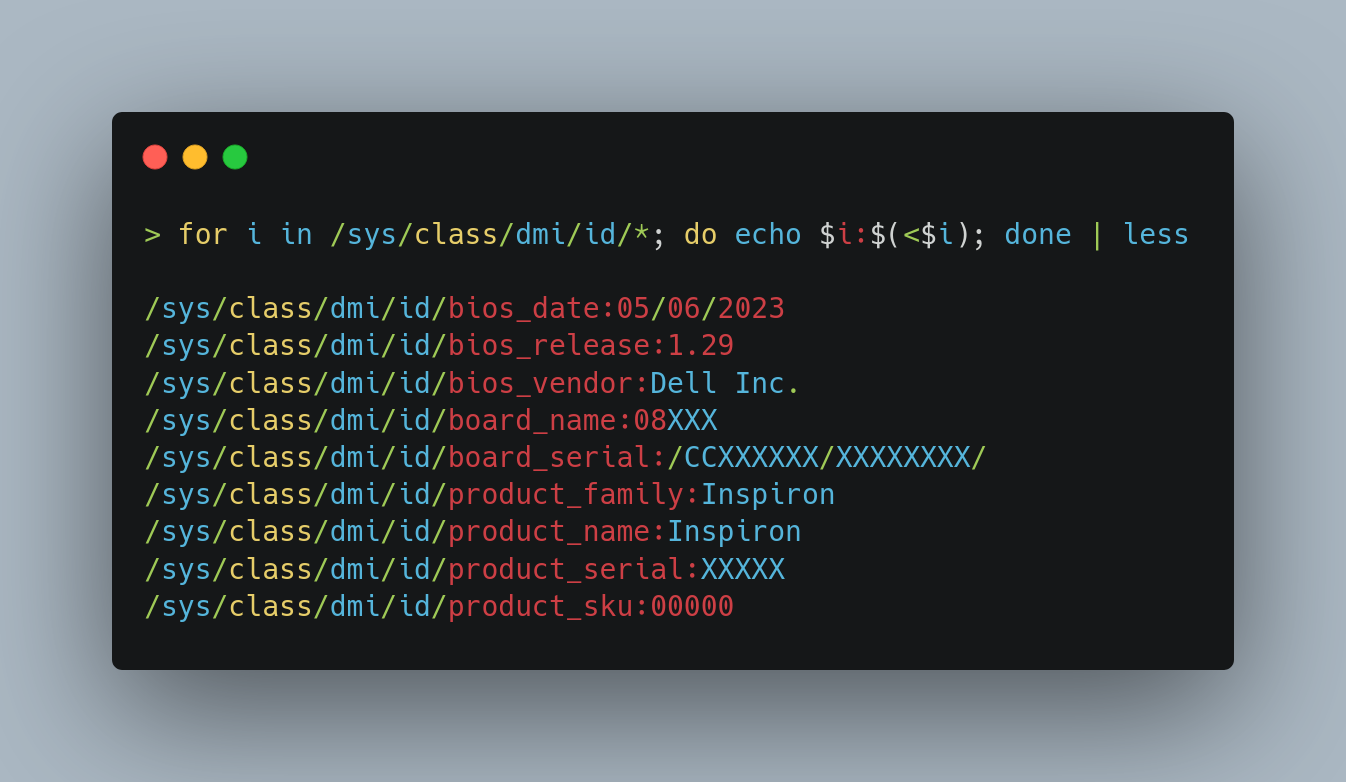
Quickly identify a Linux system’s motherboard details such as Vendor Name, Model, Serial Number, BIOS version, etc
for i in /sys/class/dmi/id/*; do echo $i:$(<$i); done | lessYou can also use other tools like: dmidecode
How to use Linux GNOME terminal like a Pro
For most users work is typically done in a web browser like Firefox or Chrome. (BTW, if you are not using Mozilla’s Firefox, I can not emphasize enough why you should switch to this opensource browser)
For advanced users i.e. IT admins, software developers, most of their time may be spent in a terminal and on Linux most often gnome terminal
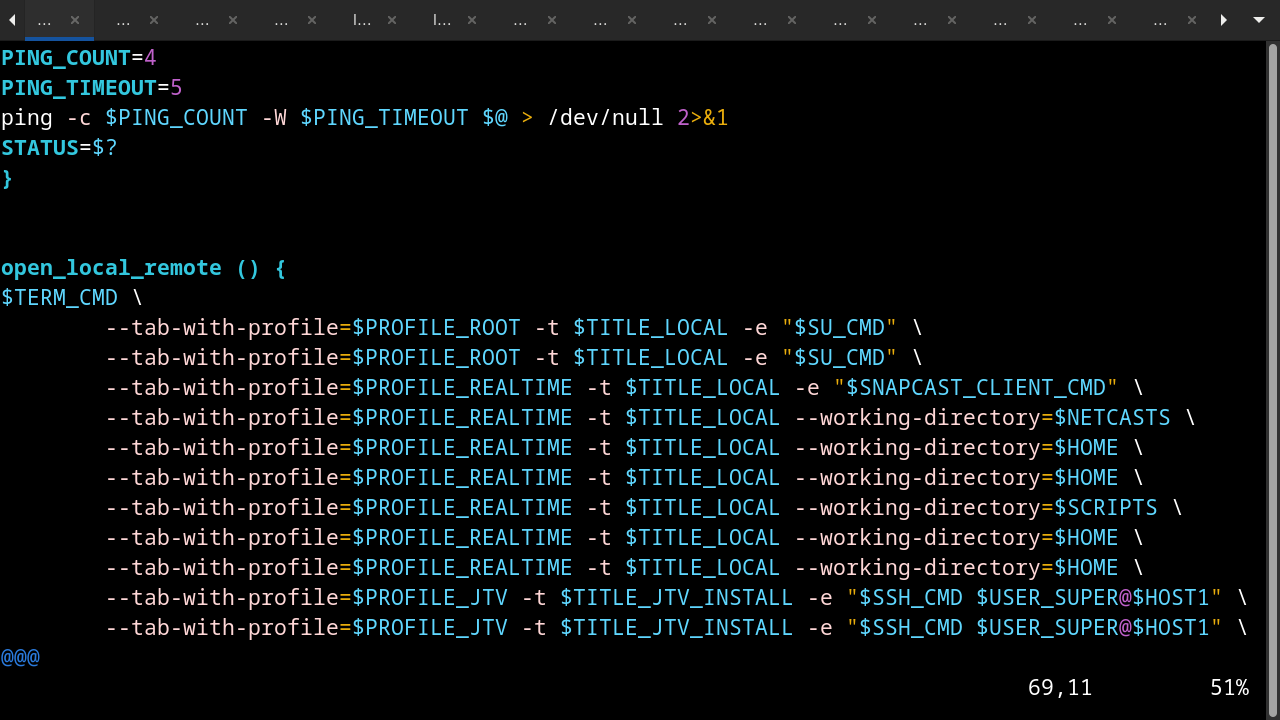
Like regular users who prefer to open multiple tabs in a browser, using tabs in a terminal is necessary for an advanced user if they are to be productive. However, it can get pretty tedious and boring having to open up multiple terminal tabs in every time you start your Linux desktop
Using the command line tool gnome-terminal this process can be automated. This tool allows you to open multiple gnome-terminal tabs like a pro i.e. At desktop startup, open several & different tabs each with its own specified directory path or run command. You can even log into a remote system, if you have setup to allow passwordless SSH connections.
Below is a basic example of gnome-terminal command in action
gnome-terminal --maximize --geometry=80x24+200+200 --display=:0 --tab-with-profile=DAY -t Local --working-directory=/projects --tab-with-profile=NIGHT -t Remote -e "ssh -t jambula@REMOTE \"cd /opt; bash\""I use this in a script which is activated by a custom keyboard shortcut to start my day
How to install LetsEncrypt certificate on Fedora Linux
Here are some quick notes on how I installed letsencrypt certificates on a couple of my old Fedora servers. This is meant to get you started fairly quickly especially if you know how to install web servers on Linux systems. While there is a client already available for Fedora 23, I found that on older versions, the apache plugin for letsencrypt does not work. For instance, when you run the command:
./letsencrypt-auto --apache -d mydomainname.com, you get an error like:
The apache plugin is not working; there may be problems with your existing configuration.
The error was: NoInstallationError()
For earlier versions, you need to install the manual way i.e. generate a certificate. While that’s a few steps from the easy and automated promise of lets encrypt, you still can’t beat the price tag of Free!
Pull the sources for letsencrypt:
git clone https://github.com/letsencrypt/letsencrypt
Change to directory:
cd letsencrypt
Run the following command, and ofcourse replace the string mydomain.com with your domain:
./letsencrypt-auto certonly --standalone --agree-tos --email joe@mydomain.com -d mydomain.com
NOTE: For multiple domains, just add ‘-d mydomain.net’
Get help by running:
./letsencrypt-auto --help
If all goes well, you should see a congratulatory message, with the location of your free certificate chain! Use this in apache or nginx configuration
Keep in mind that the certificates are only vailid for three months, and you will need to do this again.
Use systemd in Linux like a Pro – A cheat sheet
As systemd becomes the default method of handling services in all major Linux distributions, below are some quick and easy-to-remember commands that will make you look like a pro.
systemctl
- check for all running units
systemctl
TIP: To show all units, including in-active ones:
systemctl list-unit-files
- Check for failed units
systemctl --failed
- Start, stop, restart units
systemctl start postfix.service
systemctl restart postfix.service
systemctl stop postfix.service
- Check status of a specific unit
systemctl status mysqld.service
TIP: Use -l for detailed status
- Enable or disable services
systemctl enable firewalld.service
systemctl disable NetworkManager.serviceTIP: If you disable a service, and it still runs,
systemctl mask NetworkManager.service
Use ‘unmask’ to restore it
- See if a specific unit is enabled
systemctl is-enabled iptables.service
- Create a snapshot – useful for testing various targets
systemctl snapshot example.snapshot
TIP: To activate it:
systemctl isolate example.snapshot
- Reboot/poweroff/suspend your machine
systemctl reboot
systemctl poweroff
systemctl suspend
- Change current target – i.e. runlevel
systemctl isolate graphical.target
- To list current target
systemctl list-units --type=target
systemd
- See which units take a long time to start during boot up
systemd-analyze blame
TIP: You can plot the boot up using:
systemd-analyze plot
- See when a unit started and how long it took
systemd-analyze critical-chain
journalctl
- Create a running log like ‘tail -f /var/log/messages’
journalctl -f -o cat --no-pager
- Running log for a specific unit
journalctl -f -o cat --no-pager -u httpd.service
- See boot messages – like ‘dmesg’
journalctl -b
Manage remote systems:
systemctl status sshd -H root@1.2.3.4
For detailed instructions on these and more commands, man as always is your best friend.
Customize your Linux desktop using the command line
With most Linux distros now using GNOME 3.10+, here are a few commands on changing the look and feel of your desktop using gsettings. Other CLI methods exist such as the popular GNOME tweak tool and Dconf.
Add apps to favorites bar
$ gsettings set org.gnome.shell favorite-apps "['google-chrome.desktop', 'evolution.desktop', 'nautilus.desktop', 'libreoffice-writer.desktop', 'libreoffice-calc.desktop', 'firefox.desktop', 'gnome-terminal.desktop', 'vlc.desktop', 'jitsi.desktop', 'gedit.desktop', 'gcalctool.desktop']"
Change show date and clock format
$ gsettings set org.gnome.desktop.interface clock-show-date true

gsettings set org.gnome.desktop.interface clock-format '12h'
Change background picture
$ gsettings set org.gnome.desktop.background picture-uri 'file:///usr/share/backgrounds/gnome/Sandstone.jpg'
Those are just but a few of the settings available for you to tweak. To see all of them, type:
$ gsettings list-keys